DIY Halloween Door Hanger
This post may contain affiliate links. Read full disclosure.
This shop has been compensated by Collective Bias, Inc. and its advertiser, Mars Wrigley Confectionery US, LLC. All opinions are mine alone. #FlauntYourHaunt #DIYHalloweenDoorHanger #CollectiveBias
This spooky DIY Halloween door hanger is a neighborhood delight! Among Halloween door decoration ideas, this ghost is the best. It doubles as a spooky candy dispenser! When a hand reaches through the ghost’s dark black mouth, slits open to reveal a secret stash of trick-or-treat candy!

MATERIALS FOR DIY HALLOWEEN DOOR HANGER
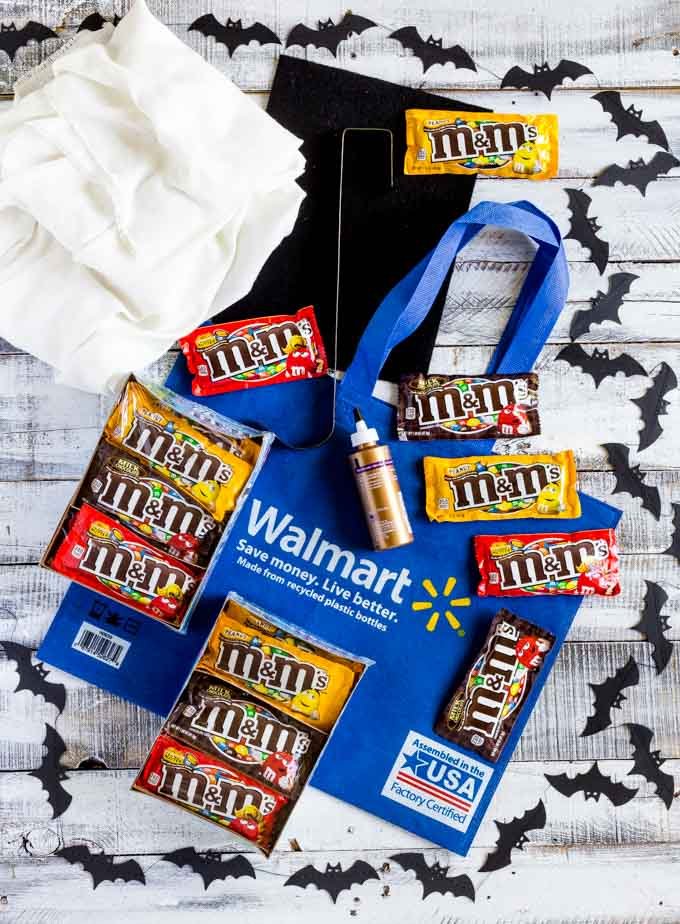
Below are the materials you’ll need to make this fun Halloween door hanger. Make one for yourself and one for a friend! They’re perfect DIY Halloween decorations that will bring excitement and joy for years to come!
- M&M’S® Chocolate Candy Variety Box (3 of these!)
- 1 Large plastic bowl
- 1 Large piece of cardboard
- 1 Metal door hanger
- 1 White cloth, 6 ft x 4 1/2 ft
- 1 Black felt, 9X12 in
- GHOST TEMPLATE PRINTABLE
- Scissors
- Utility knife – for adult use only
- Thick black permanent marker
- Clear-drying super glue
FLAUNT YOUR HAUNT > EXCITING HALLOWEEN IDEAS

DIY HALLOWEEN DECORATIONS
It’s time to shop for materials for DIY Halloween decorations, including this easy project for Halloween door hangers. At Walmart you’ll find everything you need for an exciting season of spooks, scares, terror and treats!
CLICK THE IMAGE BELOW TO START SHOPPING NOW!
HALLOWEEN GHOST DOOR DECORATION
Get your printer and scissors ready. Let’s get started on this fun DIY project!
- Print out the GHOST TEMPLATE PRINTABLE.
- Cut out the shapes for the eyes and mouth.
- Trace the patterns onto black felt. Cut out the pieces.
- On the large mouth piece, make several inside cuts as shown on the printed template. These slits, much like sharp teeth, are almost invisible! They shield trick-or-treaters from seeing the secret candy stash until the time is right!

HOW TO MAKE DIY HALLOWEEN DOOR HANGERS
With a pen, trace the circumference of the bowl onto the cardboard. Cut out the circle. Use a black permanent marker to color one side of the cardboard solid black. This black side of the cardboard will be facing into the bowl.
Continue following these easy step-by-step instructions for making one or more Halloween door hangers!
- STEP 1: Make a small cut on the cardboard and on the bowl. Run the metal door hanger through both pieces. The black side of the cardboard should face inward. Make sure the hanger is facing the proper direction: the part that hangs from the door should face away from the bowl.
- STEP 2: Glue the mouth of the bowl to the round piece of cardboard. Give the glue plenty of time to set. Use something heavy to help press down on the bowl. To protect your tabletop, place the bowl on a disposable surface. For this we’ve used an extra piece of cardboard.
- STEP 3: Trace the mouth template onto the bottom side of the bowl. Cut out the the mouth following the oval pattern traced on the bowl. As you peer through the hole, you will see the piece of cardboard that earlier you colored with a black marker.
- STEP 4: Super glue the black felt mouth piece to the perimeter of the mouth cutout on the bowl. As seen in the image, the cuts in the black felt are almost invisible. It’s so darn perfect for hiding a stash of trick-or-treat candy inside the ghost!

SPOOKY GHOST DOOR HANGER
Here’s how to assemble your DIY door hanger:
- Determine how the white cloth will lay over the ghost’s head (the white bowl). For a better effect, consider leaving the front part of the cloth about 10-12 inches longer than the back.
- Once you have determined the positioning of the cloth, find the spot that will rest right at the base of the bowl/hanger location. Make a 0.75″ cut on the cloth.
- Slide the hanger through the incision on the cloth. Let the cloth rest on the bowl. Position the cloth so that the longer end is facing forward.

HALLOWEEN DOOR DECORATION IDEAS
Here’s how to finish up this fun Halloween door decoration idea!
- When the cloth is in position, lay the ghost face up on a table. Find the mouth hole. With a pen, trace the smaller mouth cut-out template onto the white cloth. Make sure it’s lined up with the mouth hole!
- Cut the mouth hole in the cloth following the traced markings.
- Super glue the edge of the mouth hole in the cloth to the edge of the black felt that we earlier glued onto the mouth. Leave the mouth opening clear!
- Determine the location for the eyes. Glue eyes in place with a glue that dries clear. Otherwise, the glue will seep through the felt and create unattractive white spotting. Allow the glue to dry per the manufacturer’s recommendation – usually 24 hours.

HALLOWEEN DOOR HANGERS
How to enjoy your DIY outdoor Halloween decorations indoors and outdoors:
- The first week of October, hang your ghost on an inside door for the whole family to enjoy.
- Stock up on Mars candy and small age-appropriate toys at Walmart. Continue to refill the ghost with a variety of trick-or-treat items all month long!
- The last week of October, transfer your Halloween door hanger to the outside of your front door for neighbors and visitors to enjoy!

BEST DIY HALLOWEEN CRAFTS
Get Halloween ready with these fun DIY Halloween crafts!
- HALLOWEEN TREAT BAGS + PRINTABLE MOVIE NIGHT TICKETS
- DIY SPIDER PINATA
- HALLOWEEN COUNTDOWN CALENDAR
- SPOOKY HALLOWEEN PARTY TABLE

HALLOWEEN CANDY NUTRITION INFO
This DIY Halloween project nicely pairs up with yummy Mars candy! View nutritional information below.
- M&M’S® Milk Chocolate Candies
NET WT 1.69 OZ / Serving Size: 1 Pack / Calories per Serving: 230 - M&M’S® Peanut Chocolate Candies
NET WT 1.74 OZ / Serving Size: 1 Pack / Calories per Serving: 250 - M&M’S® Peanut Butter Candies
NET WT 1.63 OZ / Serving Size: 1 Pack / Calories per Serving: 240

![]()
DIY HALLOWEEN DOOR HANGER > YOUR THOUGHTS
How are you prepping for Halloween fun? Would you like to make one of these spooky-ghost door hangers? Join the conversation below!