Popovers
This post may contain affiliate links. Read full disclosure.
Most everyone loves classic popovers! These gorgeous baked goods are made with 5 simple ingredients.
Enjoyed straight from the oven, these light puffy rolls are incredibly versatile. Serve these elegant rolls for breakfast, brunch or dinner. This is an easy popover recipe anyone can make!
PIN POPOVERS NOW TO MAKE THEM LATER!

WHAT IS A POPOVER?
Popovers are light airy rolls made from a smooth egg batter mixture, similar to crepe batter. An American creation from the late 1800s, it’s an English Yorkshire pudding recipe spin-off.
- On the outside, popovers are crisp and golden brown. On the inside, their hollow cavity is soft, custardy, and spongy.
- They’re best enjoyed straight from the oven while still hot and puffy. Later they gently deflate.
- Popovers don’t contain a leavening agent like baking power, baking soda or yeast. Instead, they get an impressive rise from steam in a hot oven.
- During the first 15 minutes of baking, moisture in the batter generates a huge amount of steam. As pressure builds, the batter is pushed sky high!

why this is the bEST POPOVER RECIPE
Easier to make than pancake batter, the mixture comes together in 3 minutes. It’s pure happiness to make these special rolls in a dedicated popover pan! But you can also make them in a muffin tin.
After experimenting with the number of eggs, I found 3 eggs are ideal. I tried different oven temps and baking times to produce rolls that are cooked on the inside without over-browning. I settled on 425°F to start, then lowered the temp to 350°F to finish baking.
This post is full of helpful techniques to achieve the best results for this popover recipe. We all want tall crispy puffs with a beautiful bakery-style look. My expert tips will give you the confidence you need to bake up a batch of gorgeous rolls that will have your family reaching for seconds.


Why a popover pan is a great investment
I’m all about investing in multi-purpose kitchen tools. But this popover pan is an exception. If you love this recipe and make popovers often, this specialty pan is a great investment. Its unique shape creates stunning rolls.
As steam builds within the batter, the narrow base and tall sides of the cups perform like coaches directing a team of athletes. They continuously root on the batter from the sides, steadfastly encouraging their upward climb. Watching this performance through the oven window is captivating!
However, if this is your first time making popovers, try using a muffin pan, Pyrex custard cups, or ramekins. These cute little rolls will be shorter, stouter and a bit more custardy. But they’ll still taste incredibly good!
- POPVER PAN RECIPE YIELD: 6 large popovers
- MUFFIN PAN RECIPE YIELD: 12 small popovers

INGREDIENTS FOR POPOVERS
No specialty ingredients are required for popovers! This recipe comes together with 5 basic refrigerator and pantry items plus some cooking spray.
If you’d like to add a small touch of sweetness to these rolls, add 1 teaspoon granulated sugar and 1/2 teaspoon vanilla extract!
Most likely, you have these ingredients available in your kitchen right now.
- Milk
- Large eggs
- Sea salt
- All-purpose flour
- Butter
SERVING SUGGESTIONS: For breakfast, serve popovers with butter, maple syrup, honey or jam. For dinner, pair them with roast beef and mashed potatoes, or holiday entrees! For dessert, add a scoop of ice cream to their hollow centers, or dust their tops with powdered sugar.

INGREDIENT ADD-INS
These rolls are very versatile. With simple add-ins, you can customize them for any meal. Bundled in a linen cloth and presented in a bread basket, they’re a perfect addition to your serving table!
- BREAKFAST OR BRUNCH: To the batter, add 1/2 teaspoon vanilla extract plus 1 teaspoon granulated sugar.
- DINNER: Make the rolls savory by adding cheddar cheese, chives, or a little thyme. Add prime rib or roast beef drippings to the cavities of the pan before pouring in the batter.
- DESSERT: Dust their golden crowns with cinnamon sugar. Or lightly drizzle the rolls with a powdered-sugar icing.

EASY popover recipe
This is an easy popover recipe. The first tip for achieving mile-high popovers is having the milk and eggs at room temperature. Don’t skip this step!
But there’s no need to set items out on the counter and wait until they lose their chill. Here’s how to bring our 2 key ingredients to lukewarm in a snap!
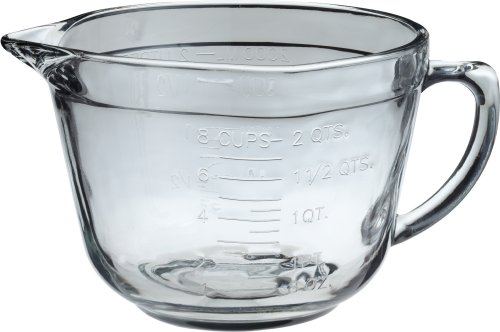
- HOW TO QUICKLY BRING MILK TO ROOM TEMPERATURE: Pour the milk into a Pyrex measuring cup and microwave for 40-60 seconds, or until the liquid is lukewarm but not hot.
- HOW TO QUICKLY BRING EGGS TO ROOM TEMPERATURE: Fill a mixing bowl with hot water. Immerse the eggs just long enough for them to shed their chill and become room temp.

HOW TO MAKE POPOVERS
- STEP 1: In a batter bowl, whisk eggs and milk together.
- STEP 2: Sprinkle in sea salt and flour. Whisk until the mixture is smooth with the consistency of heavy cream.
- STEP 3: Add melted butter to the bowl. Whisk until incorporated. Allow batter to rest 10 minutes before preheating the oven. The batter will be resting an additional 10 minutes as the oven is being preheated. This 20-minute resting phase is vital for a high rise.
- STEP 4: Adjust oven rack to the lowest position. This will give the popovers room to rise without getting scorched. Preheat oven to 425°F. Once the oven reaches temperature, preheat the popover pan for 2 minutes. Remove from oven. Quickly spray down the wells of the pan.

- STEP 5: Divide batter between the 6 wells of a popover pan, filling each just above 3/4 full. For a muffin pan, fill the wells 1/2 full.
- STEP 6: Bake popovers for 15 minutes at 425°F. Reduce oven temp to 350°F. Bake 10-15 minutes more, or until popovers are a golden brown and done.
WHAT TO NOTICE WHEN LOOKING THROUGH THE OVEN WINDOW:
The rise happens during the first 15 minutes. After that, they’ll finishing baking, become brown and some of their tops and sides will split.
Do not open the oven door while baking. Instead peek through the oven window. Toward the end of baking, look for signs of visible moistness in their yellow centers. If you see that, they still need to bake for a bit longer.

EXPERT TIPS FOR SKY-HIGH POPOVERS!
These 7 expert tips will help you achieve recipe success! You’ll enjoy a batch of beautifully tall popovers like you’ve seen in magazines, on hotel breakfast counters, or in grandma’s kitchen on Christmas morning.
- ROOM TEMP INGREDIENTS: Having the milk and eggs at room temperature is critical for high-rise popovers. In a hot oven, these warm ingredients help these baked goods create steam so they can rise and expand quickly before a crust sets, at which point the rising stops.
- USE A BATTER BOWL: This makes pouring the batter into the wells of the pan quick and easy!
- BATTER RESTING PHASE: This is essential. Allowing the batter enough time to rest (15 minutes to 1 hour) gives the flour time to hydrate and swell. The thin batter becomes just a bit thicker. This results in a higher rise, a more uniform structure overall, and a delicate texture!
- PREHEATING THE BAKING PAN: It’s incredibly important to preheat the pan for 2 minutes. You can either drizzle melted butter inside the wells before preheating, or spray down the pan with cooking spray after removing it from the oven. I prefer the latter. It prevents the possibility of butter dripping down to the bottom of the oven and causing smoke.
- NO PEEKING: Once the popovers enter the oven, don’t open the oven door until baking is done!
- RELEASE OF STEAM: To prevent popovers from becoming withered once removed from the oven, cut a slit into the side of each popover. Gently twist the knife to release steam. Remove popovers from the pan. Do these 2 steps ASAP!
- ENJOY IMMEDIATELY: After a meteoric rise in the oven, popovers start to settle and deflate while cooling. It’s always best to serve and enjoy them immediately!

popover recipe faqs
- BEST TYPE OF FLOUR FOR POPOVERS? All-purpose flour delivers the best texture. Popovers made with bread flour are a bit tough and chewy. Cake/pastry flour is too delicate. It will not provide these baked goods with enough strength for a rise that holds.
- HOW TO PREVENT OVER-BROWNING? If your oven is over-browning the rolls which are placed on the lowest rack, insert a second oven rack in the top position. Put a baking tray on that top rack. This will help shield the tops from over-browning.
- CAN BATTER BE REFRIGERATED OVERNIGHT? This is a good option if you want to make just a few popovers the first day and save the remaining batter for the following day. However, you will need to remix the batter and rewarm it to room temperature before using.
- WHAT IS YORKSHIRE PUDDING? The British will often pour popover batter over hot fat or beef drippings (such as prime rib or roast beef drippings), in a roasting pan then bake it in hot oven. This creates one very large, singular piece of pudding that’s puffy and dry.

MORE BAKED GOODS TO MAKE ASAP
I WANT WHAT SHE HAS
Beautiful cooking tools bring happiness to the kitchen! They make meal prep a joyful experience. Did you see something here you’d like to own?
Below are affiliate links for purchasing the items on Amazon.
- BOOS BLOCKS – XL maple board
- PYREX MEASURING CUP
- ANOLON RAMEKINS
- GLASS BATTER BOWL
- SILICONE WHISK
- POPOVER PAN
POPOVERS > RATE THIS RECIPE! ⭐️⭐️⭐️⭐️⭐️
Friends say this is the best popover recipe! If you agree, give these baked goods a 5-star rating in the comments.
Print
Popovers
- Total Time: 50 Minutes
- Yield: 6 Popovers 1x
Description
These classic popovers have a delicate tender texture. They’re the perfect breakfast pastry or dinner roll. Sprinkled with powdered sugar or filled with ice cream, they make incredible desserts. This is the best popover recipe!
Ingredients
- 1 1/2 cups milk, lukewarm
- 3 large eggs, room temperature
- 1 teaspoon sea salt
- 1 1/2 cups all-purpose flour
- 3 tablespoons butter, melted
OPTIONAL: To add a touch of sweetness to these classic popovers, add 1 teaspoon granulated sugar and 1/2 teaspoon vanilla extract.
Instructions
- In a batter bowl, whisk eggs and milk together. Sprinkle in sea salt and flour. Whisk until the mixture is smooth with the consistency of heavy cream. Add melted butter to the bowl. Whisk until incorporated.
- Allow batter to rest 10 minutes before preheating the oven. The batter will be resting an additional 10 minutes as the oven is being preheated (so a total of 20 minutes resting time). This resting phase is very important for a nice high rise.
- Adjust oven rack to the lowest position. This will give the popovers room to rise without getting scorched. Preheat oven to 425°F. Once the oven reaches temperature, preheat the popover pan for 2 minutes. Remove from oven. Quickly spray down the wells of the pan.
- POPOVER PAN: Divide the batter evenly between the 6 wells, filling each just above 3/4 full. If using a MUFFIN TIN you’ll be making two batches: Fill just 6 of the 12 wells of the muffin pan 1/2 full, leaving an unused well in between the popovers. Reduce baking time when using a muffin tin.
- Bake popovers for 15 minutes at 425°F. Reduce oven temp to 350°F. Bake 10-15 minutes more, or until popovers are golden brown and done.

Notes
These expert tips will help you achieve recipe success! You’ll enjoy a batch of beautifully tall popovers like you’ve seen in magazines, on hotel breakfast counters, or in grandma’s kitchen on Christmas morning.
- ROOM TEMP INGREDIENTS: Having the milk and eggs at room temperature is critical for high-rise popovers. In hot oven, these warm ingredients are able to start the steaming process faster which supports the expansion and rise before a crust forms, at which time the rising stops.
- BATTER RESTING PHASE: This is essential. Allowing the batter enough time to rest (15 minutes to 1 hour) gives the flour time to hydrate and swell. The batter becomes a bit thicker. This results in a higher rise, a more uniform structure overall, and a delicate texture!
- PREHEATING THE BAKING PAN: It’s incredibly important to preheat the pan for 2 minutes. You can either drizzle melted butter inside the wells before preheating, or spray down the pan with cooking spray after removing it from the oven. I prefer the latter. It prevents the possibility of butter dripping down to the bottom of the oven and causing smoke.
- NO PEEKING: It’s vital that once the popovers are in the oven baking you do not open the oven door until the cooking time is over!
- RELEASE OF STEAM: This is time sensitive! To prevent popovers from becoming withered, quickly cut a slit into the side of each popover with a sharp knife. Gently twist the knife to release steam. This needs to happen immediately. Then remove popovers from the pan ASAP!
- MORE INFO ABOUT THIS RECIPE: Further tips for making sky-high tall popovers are included in the body of the post, along with helpful step-by-step recipe images.
- Prep Time: 5 Minutes + 20 Minutes Resting
- Cook Time: 25 Minutes
- Category: Breakfast, Dessert
- Method: Oven
- Cuisine: American
POPOVERS > JOIN THE CONVERSATION
Are you familiar with popovers? Have you made them before? What do you think of this easy recipe? Join the conversation in the comments below!


These look amazing! I am so excited to try these with my family for a tasty breakfast!
Yummy! These are so delicious and tasty! Can’t wait to make these! My family is going to love them!
These popovers are very cool! I can’t believe you don’t need a special pan to make them, that is awesome. I will give them a go on the weekend, thanks.
I didn’t know what they were, so I was particularly glad of your explanation. They look amazing.
I absolutely LOVE popovers, and I had no idea how easy they were to make at home!! I can’t wait to try your recipe for a brunch spread I’m making this weekend!
What a perfect pantry staple recipe! I love how I can make it whenever I want for a quick bite because I always have those ingredients on hand. Thanks for sharing such a fun dish :D
I love popovers for breakfast. I can’t get enough of how pretty your popovers look. I feel like I must finally break down and get a proper specialty tin instead of always hacking it with a muffin pan. :)