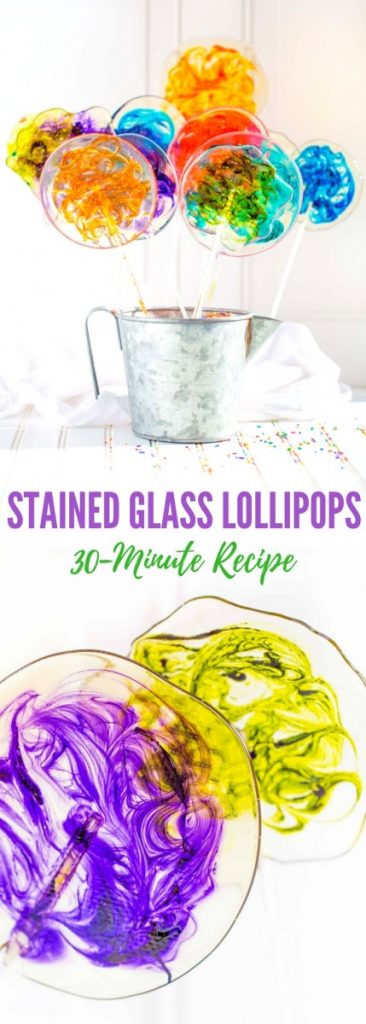
Stained Glass Lollipops
This post may contain affiliate links. Read full disclosure.
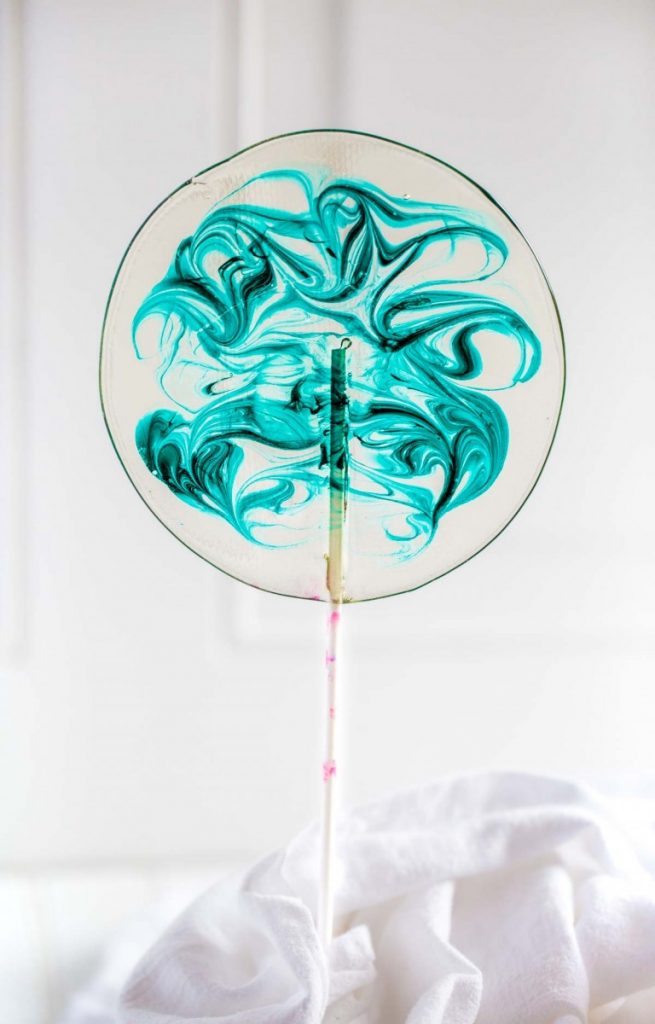
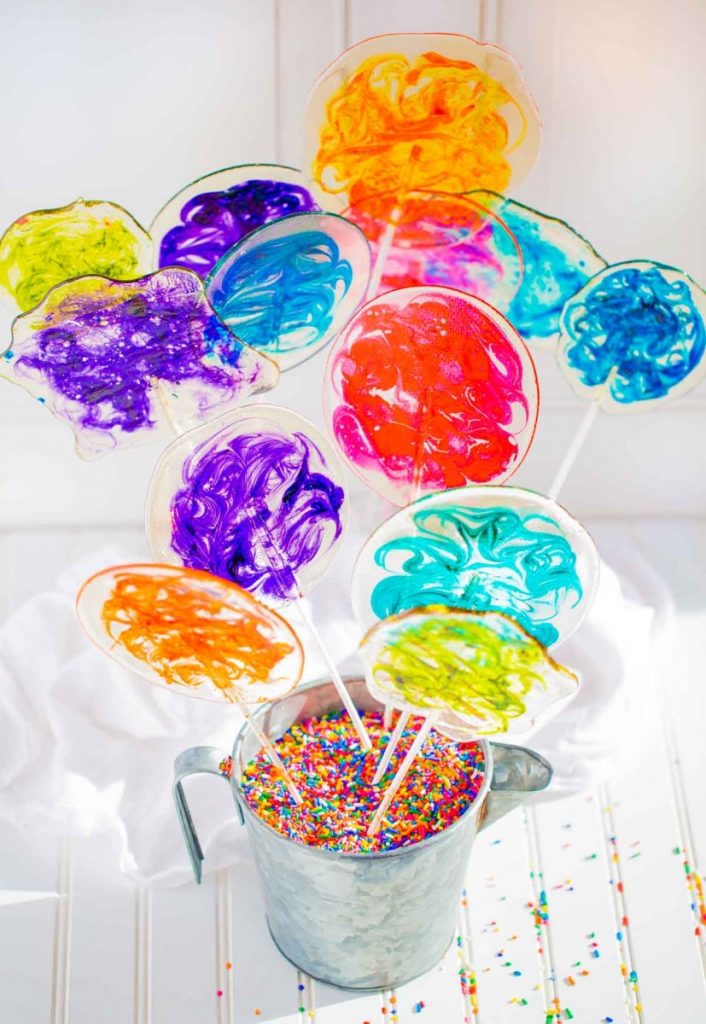
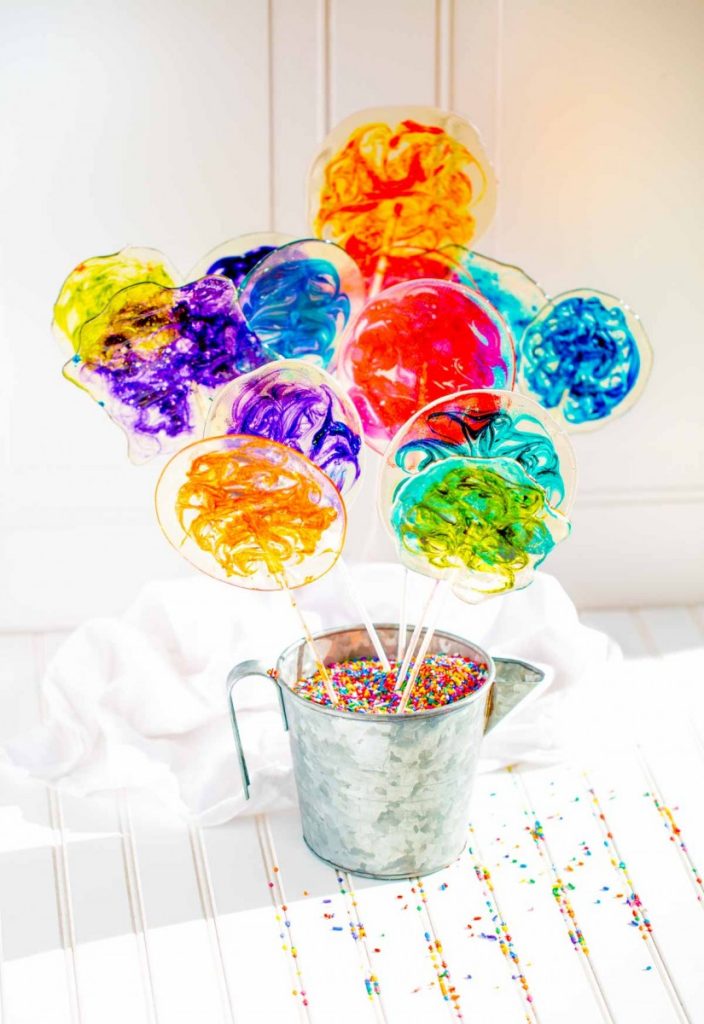
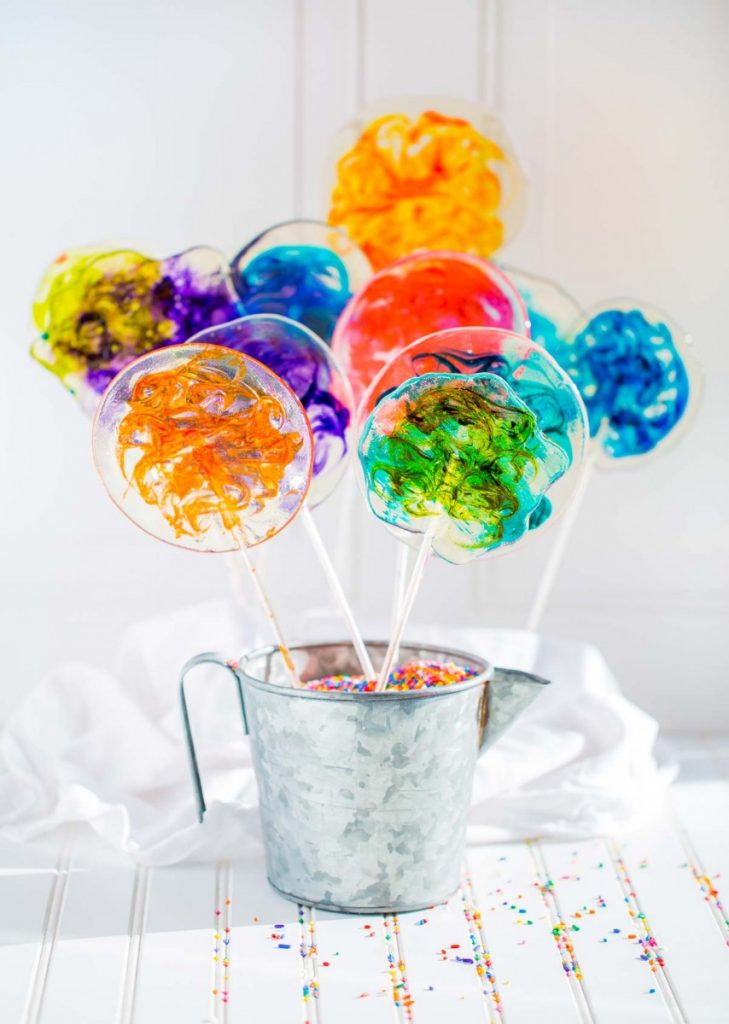
These gorgeous stained glass lollipops with bright colorful swirls stir up fun childhood memories. When I was in the first and second grades I was a Blue Bird / Camp Fire Girl, which is very similar to being a Brownie in Girl Scouts. Our troop was lucky enough to have moms who were super crafty and talented like Martha Stewart. For a holiday party one mother made homemade swirl lollipops that had everyone oohing and aahing! Today I’m excited to share my vintage stained glass lollipop recipe that’s surprisingly simple and easy to make.

5 Simple Ingredients for Stained Glass Lollipops Recipe
These are the five simple ingredients you’ll need to make homemade stained glass lollipops: granulated sugar, cold water, light corn syrup, your choice of flavoring, and neon gel food coloring. To flavor my lollipops I like using pure orange extract or a mixture of orange and vanilla, but you can use other extracts like peppermint, coconut, lemon, cherry, lime, or even rootbeer concentrate. You’ll also need parchment paper or silicone mats, extra-long lollipop sticks, and cellophane for wrapping the lollipops. You can also get creative and embed colorful candy sprinkles or edible flowers inside your lollipops!
Homemade Swirl Lollipops
An essential kitchen tool for making gourmet swirl lollipops is a candy thermometer. I wouldn’t attempt to make this lollipop recipe without one! The perfect pot size for this hard-candy recipe is a 3-quart pan. With clean-up in mind, I advise using a pot that can withstand a hard scrubbing with a kitchen scraper and not get ruined.
Important Technique for Making Gourmet Lollipops
Begin by adding three cups of granulated sugar to your clean dry pot. Add in the cold water using this important technique: slowly turn the pot 360 degrees as you pour the water tightly around the wall of the pot. This is to ensure that no sugar granules are attached to the interior walls of the pot. If any sugar granules are on the sides, they will harden and crystalize. When making lollipops you want a nice clear syrup.
Hard Candy Recipe for Making Lollipops
Pour the light corn syrup in the center of the pot, allowing it to spread to the edges and meet the water. Let these three ingredients sit in the pot for 12-15 minutes so the liquids can completely soak down into the sugar. With a clean finger, briefly stir the ingredients to make sure everything is well combined.
What is the Hard Crack Stage When Making Lollipops?
The hard-crack stage for making lollipops is 305 F. Place the pot over medium heat. DO NOT STIR the sugar mixture as it cooks. The mixture will gradually start to boil. As the liquid evaporates the bubbling will get pretty intense. Use your candy thermometer to track the temperature of the mixture. Once it reaches 305 F, it’s at the perfect “hard crack stage” that’s needed for making lollipops. The amount of time it takes for the mixture to reach 305 F will vary depending on the level of humidity and the type of cooktop you’re using. So it’s important to keep on top of things by frequently checking the temperature. In Northern California, where I live, it takes approximately 25 minutes on my gas stove for the sugar to reach the hard-crack stage.
Set-up for Making Swirl Lollipops
While the sugar mixture is cooking, set things up for making your lollipops. Create an ice-water bath for your pot. You can use the small portion of your kitchen sink or a heat-resistant bowl filled with ice cubes and water. Pull out a heat-resistant glass measuring cup with a pouring spout. Set out your measuring spoons and desired flavoring. Pull out two or three large baking trays without an edge so the lollipops and their sticks will have a long flat surface to lay on. Line them with silicone mats or parchment paper. If your countertops are granite or another surface that can handle high heat, then you can just place the silicon mats directly on your countertops.
Giant Swirl Lollipops
Place your lollipop sticks right next to the silicone mats, take the lids off your gel food coloring so they’re ready to use, and set out several toothpicks or cake decorating scriber needles. You’ll need a separate one for each color. You can also use the end of the lollipop sticks for making the swirls. It’s important to have everything ready to go, because once the hard-candy mixture reaches the hard crack stage, you have to act quickly to form and decorate the lollipops before they harden.
What Size Lollipop Sticks to Use for Giant Stained Glass Lollipops?
To make these giant stained glass lollipops look extra special and elegant, I use lollipop sticks that are 11-3/4 inches. This stained glass swirl lollipop recipe makes 5 giant lollipops. If you prefer to make a batch of much smaller lollipops, you can use cake pop sticks that are 8 inches long.
How to Make Lollipops
The very moment the candy thermometer displays 305 F, remove the pan from heat. Immediately add in the flavoring and swirl the pot back and forth to mix it in. Right away stick the pot in the ice-water bath for 15-18 seconds to stop the temperature of the sugar mixture from rising. If the temperature rises above the “hard crack stage” it will turn a yellow or amber color and will start to caramelize. We want our lollipops to be stained glass clear so we can add in those beautiful colorful swirls.Remove the pan from the ice bath and immediately pour the sugar mixture into an oven-safe glass measuring cup.
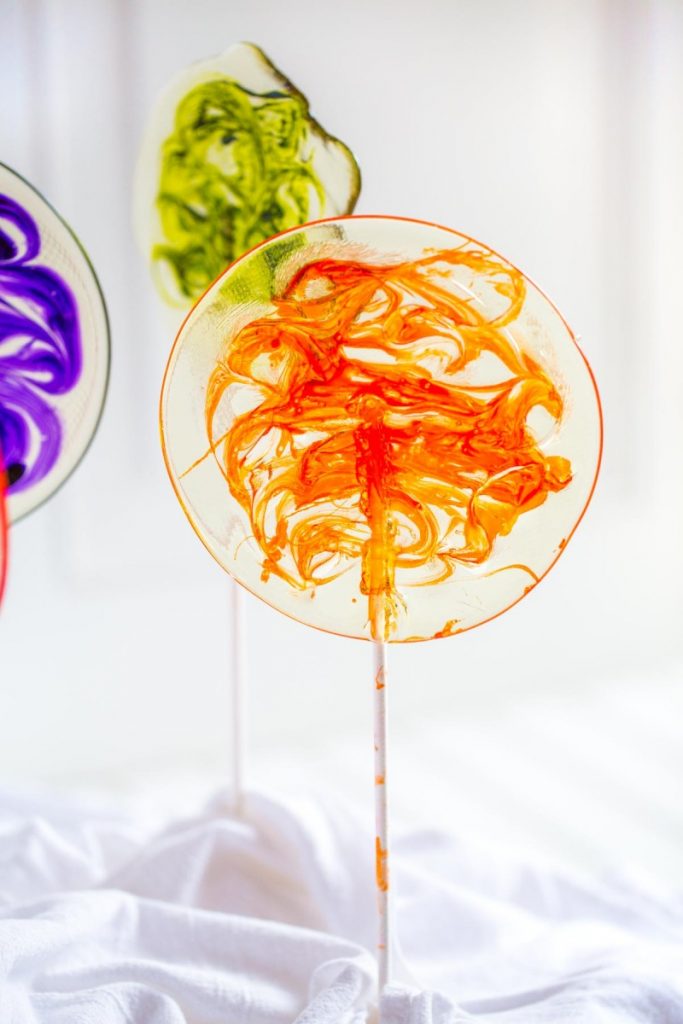
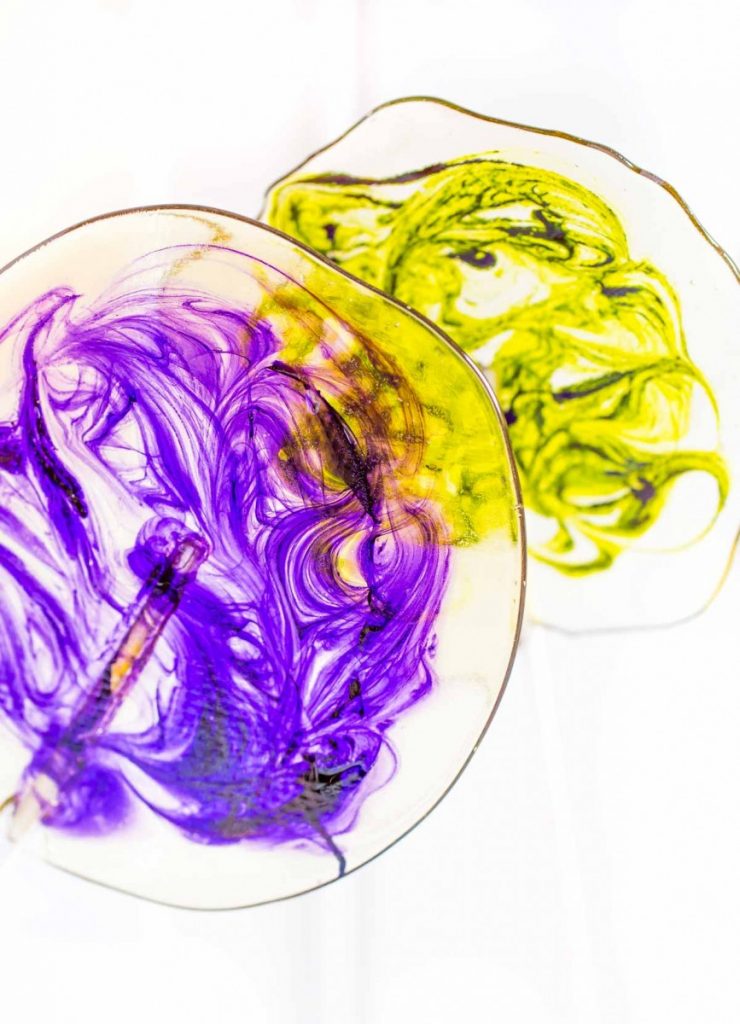
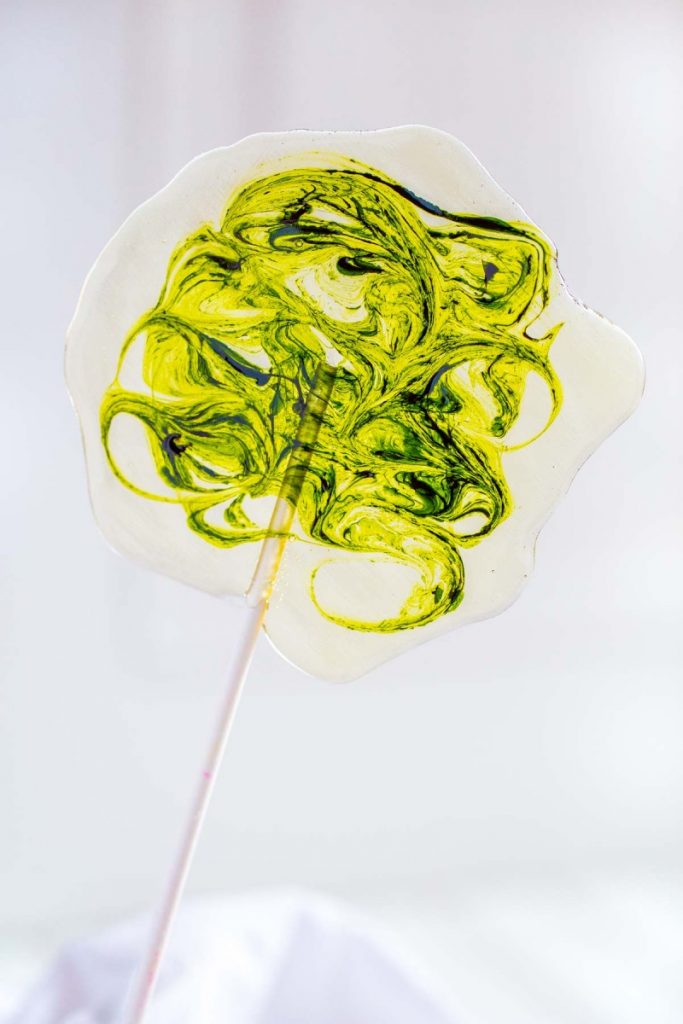
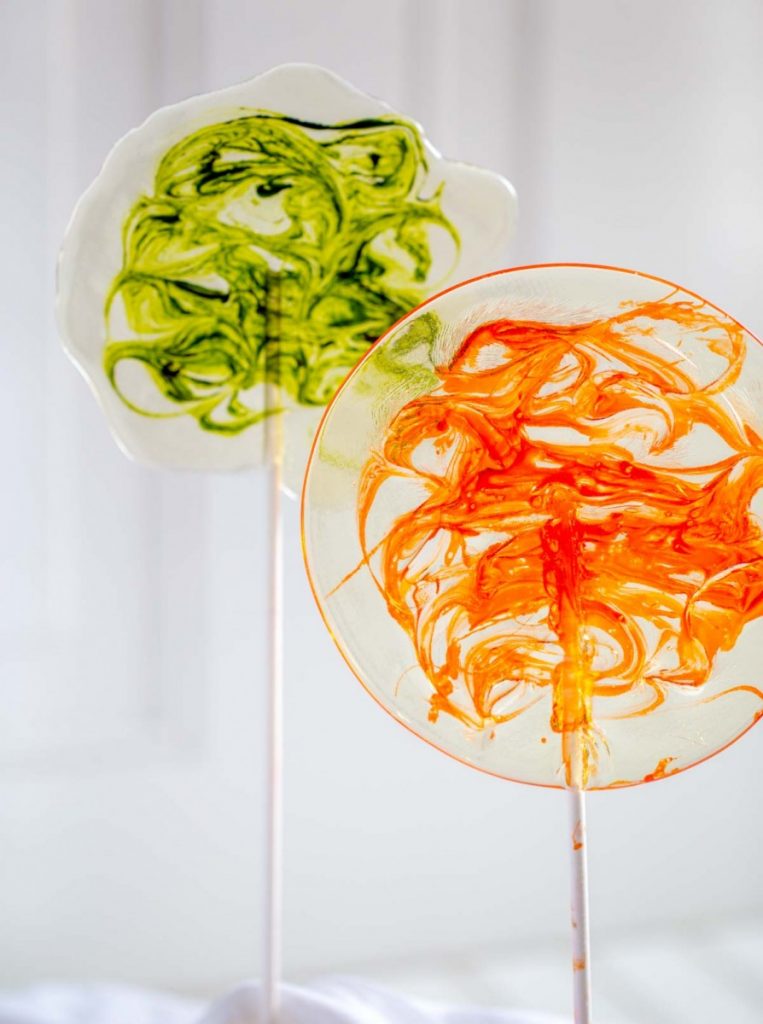
How to Make Free-Form Lollipops with Colorful Swirls
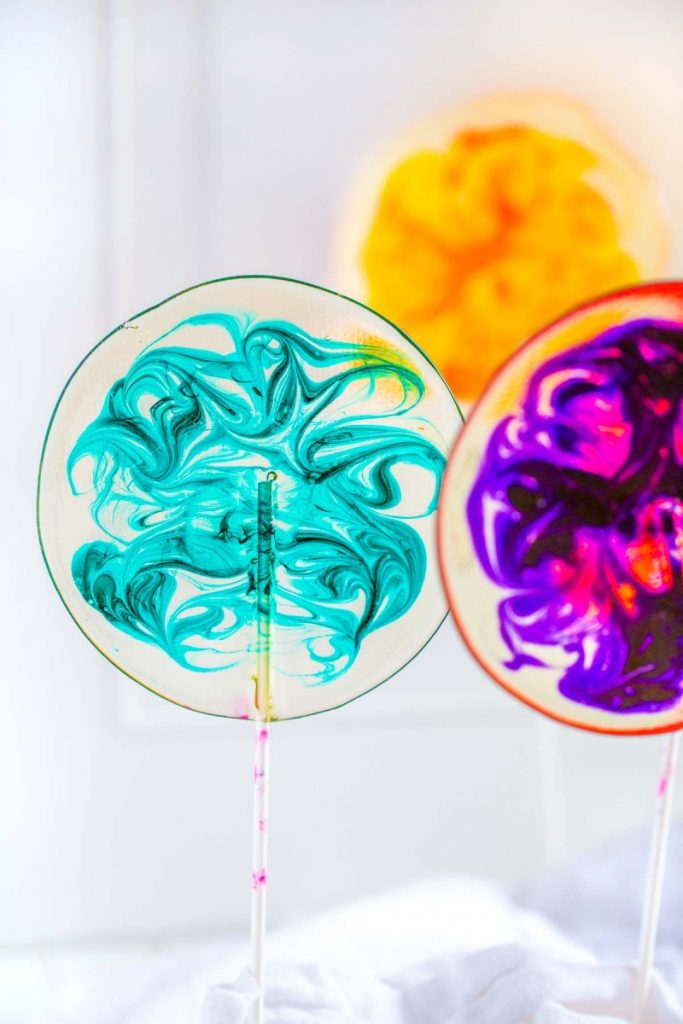
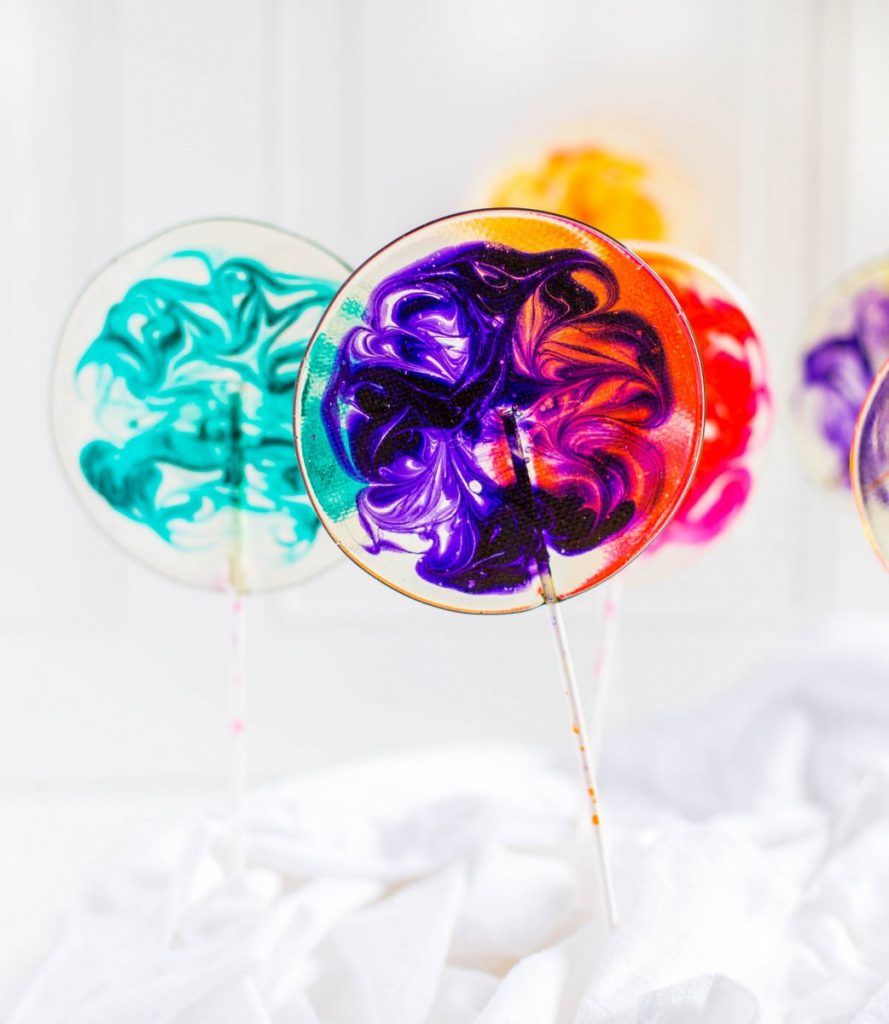
These are free-form lollipops so you don’t need molds. To form the lollipops, pour the scalding hot liquid directly onto your silicone mats or parchment paper. I suggest pouring only two at a time because they harden up fast! Immediately place a few drops of gel food coloring onto the first lollipop. I use scriber needles to quickly swirl around the food coloring in a colorful design, but you can use a lollipop stick or a toothpick. Quickly place the lollipop stick into the lollipop about half way up and rotate the stick 360 degrees. Place another dollop of hot syrup over the embedded lollipop stick just to give it some added stability. If the syrup starts to harden before you can finish pouring the lollipops and decorating them, no worries! Simply stick the glass measuring cup with the syrup into the microwave for a few seconds to heat it up and you’re ready to go again. Allow the lollipops to cool and harden before lifting and wrapping in cellophane.
Tips for Clean Up After Making Homemade Stained Glass Lollipops
Don’t panic when you see a layer of syrup hardened on the bottom of your pot and glass measuring cup. Fill your pot 1/5 of the way up with water and boil it to loosen the syrup. Drain the hot water and scrub off the syrup off with a kitchen scraper. You’ll need to repeat the boiling and scraping process a few times to remove all of the syrup. To lift syrup off your heat-safe glass measuring cup, fill it halfway with water and stick it in the microwave. Heat the water to melt the hardened sugar. Let the hot water sit in the cup for a few minutes to loosen things up, then drain the water and use a kitchen scraper. With a little patience and scrubbing it will come off!
Kitchen Tools and Supplies for Stained Glass Lollipops
These are the essential kitchen tools and supplies I used to make these fabulous stained glass lollipops with bright and colorful swirls. Gel food coloring works much better than regular food coloring because it’s nice and thick and easier to work with when making the swirls. The result is stunning! I love my super affordable set of scriber needles. They’re perfect for creating beautiful swirls in these lollipops.

![]()

![]()

![]()

![]()

![]()

![]()

![]()

![]()

![]()

![]()
![]()

Stained Glass Lollipops Recipe
- Total Time: 30 minutes
- Yield: 16 servings 1x
Description
These gorgeous free-form stained glass lollipops with colorful swirls are quick and easy to make! They look gorgeous and are super festive. They’re perfect for birthday parties, baby showers, wedding showers and old-fashioned spring/summer fun!
Ingredients
- 3 cups granulated sugar
- 1 cup cold water
- 1 cup light corn syrup
- 3/4 teaspoon of your favorite extract (vanilla, orange, peppermint, cherry, lime, root beer, etc.)
- Neon gel food coloring
Instructions
SET-UP
It’s important to have everything set out and ready to go before you begin this recipe. Once once the hard-candy mixture reaches the hard crack stage, you have to act quickly to form and decorate the lollipops before they harden.
- Create an ice-water bath for your pot. You can use the small portion of your kitchen sink or a heat-resistant bowl filled with ice cubes and water. Pull out a heat-resistant glass measuring cup with a pouring spout. Set out your measuring spoons and desired flavoring. Pull out two or three large baking trays and line them with silicone baking mats or parchment paper.
- Place your lollipop sticks right next to the silicone mats, take the lids off your gel food coloring so they’re ready to use, and set out several toothpicks or cake decorating scriber needles. You’ll need a separate one for each color. You can also use the end of the lollipop sticks for making the swirls.
INSTRUCTIONS FOR STAINED GLASS LOLLIPOPS
- Begin by adding three cups of granulated sugar to your clean dry pot. Add in the cold water using this important technique: slowly turn the pot 360 degrees as you pour the water tightly around the wall of the pot. This is to ensure that no sugar granules are attached to the interior walls of the pot. If any sugar granules are on the sides, they will harden and crystalize. When making lollipops you want a nice clear syrup.
- Pour the light corn syrup in the center of the pot, allowing it to spread to the edges and meet the water. Let these three ingredients sit in the pot for 12-15 minutes so the liquids can completely soak down into the sugar. With a clean finger, briefly stir the ingredients to make sure everything is well combined.
- The hard-crack stage for making lollipops is 305 F. Place the pot over medium heat. DO NOT STIR the sugar mixture as it cooks. The mixture will gradually start to boil. As the liquid evaporates the bubbling will get pretty intense. Use your candy thermometer to track the temperature of the mixture. Once it reaches 305 F, it’s at the perfect “hard crack stage” that’s needed for making lollipops.
- The very moment the candy thermometer displays 305 F, remove the pan from heat. Immediately add in the flavoring and swirl the pot back and forth to mix it in. Right away stick the pot in the ice-water bath for 15-18 seconds to stop the temperature of the sugar mixture from rising. If the temperature rises above the “hard crack stage” it will turn yellow or amber color and will start to caramelize. We want our lollipops to be stained glass clear so we can add in those beautiful colorful swirls. Remove the hot pan from the ice bath, taking care not to get any water inside the pan. Immediately pour the sugar mixture into an oven-safe glass measuring cup.
- To form the lollipops, carefully pour the scalding hot liquid directly onto your silicone mats or parchment paper. I suggest pouring only two lollipops at a time because they harden up fast! These are free-form lollipops so you don’t need lollipop molds for this recipe. Immediately place a few drops of gel food coloring onto the first lollipop. I use scriber needles to quickly swirl around the food coloring in a colorful design, but you can use a lollipop stick or a toothpick. Quickly place the lollipop stick into the lollipop about half way up and rotate the stick 360 degrees. Place another dollop or two of hot syrup over the embedded lollipop stick just to give it some added stability. If the sugar syrup starts to harden before you can finish pouring the rest of your lollipops, no worries! Simply stick the glass measuring cup with the syrup into the microwave for a few seconds to heat it up and you’re ready to go again. Allow the lollipops to cool and harden before lifting and wrapping in cellophane.
Notes
For a boozy version of these stained glass lollipops, check out Sugar & Cloth’s DIY Spiked Lollipops.
- Prep Time: 5 minutes
- Cook Time: 25 minutes
- Category: Dessert, Party
- Method: Stovetop
- Cuisine: American
![]()
STAINED GLASS LOLLIPOPS RECIPE > PIN IT TO PINTEREST
Save this beautiful STAINED GLASS LOLLIPOP RECIPE for later. Pin it to Pinterest!
Fun Festive Recipes for Parties and Special Occasions
PINK POPCORN

PEANUT BUTTER BLOSSOMS
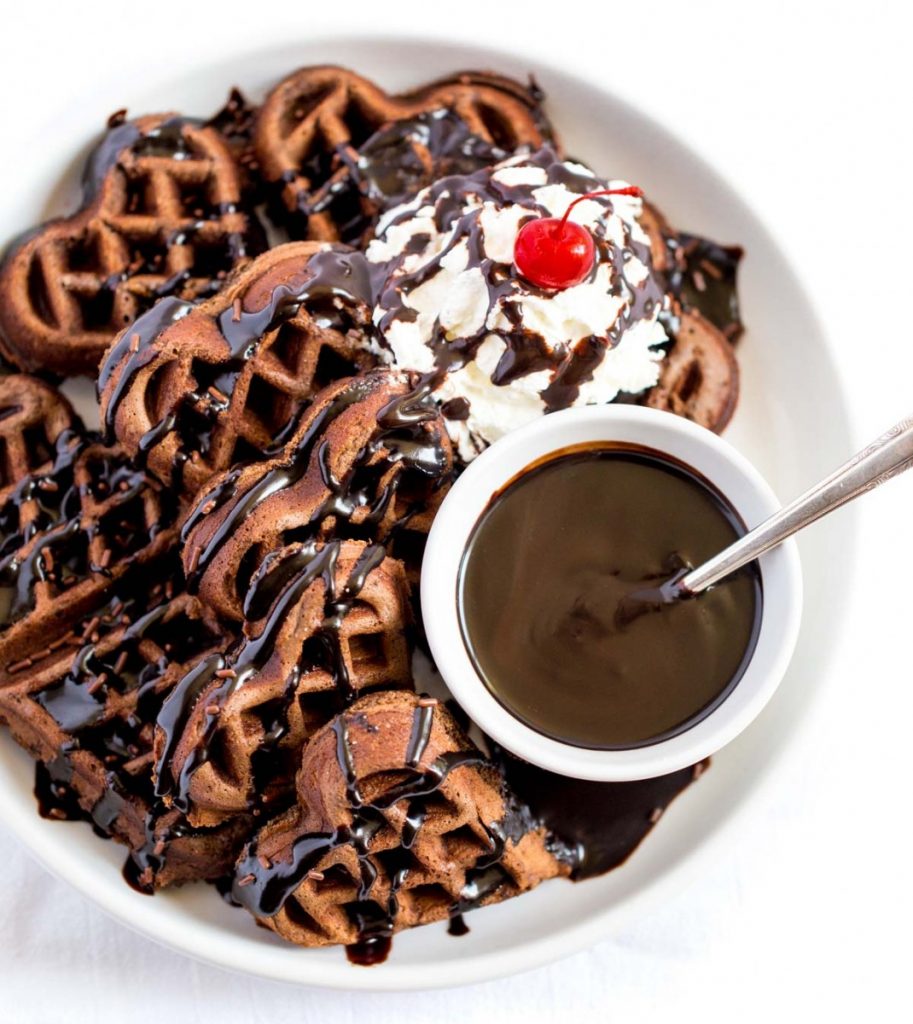
TRIPLE CHOCOLATE BELGIAN WAFFLES
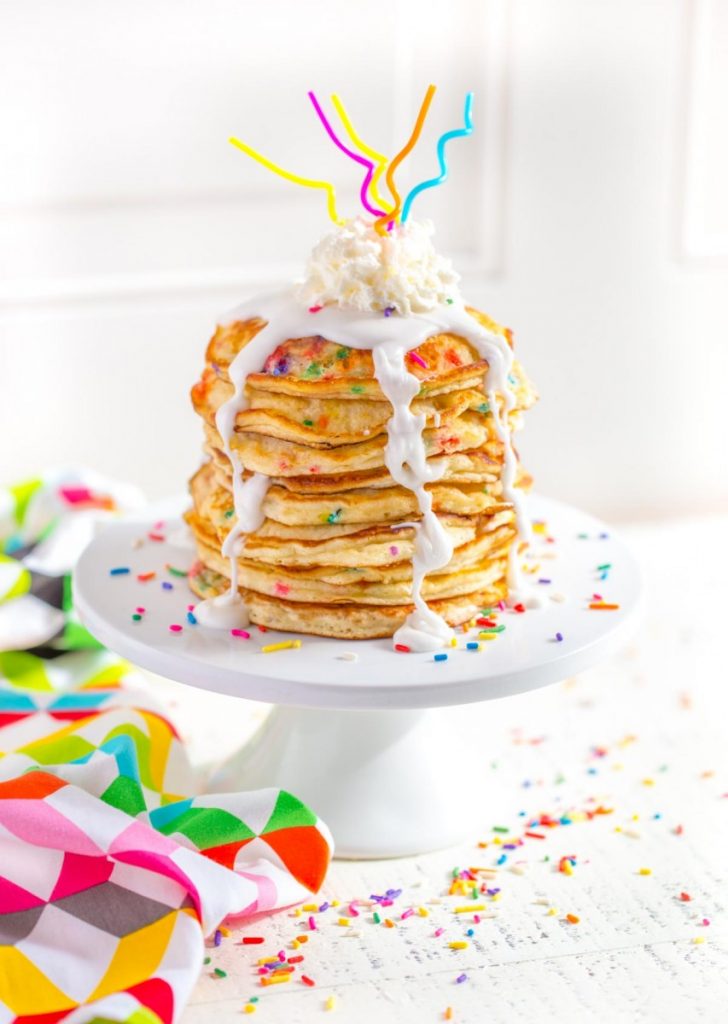
FUNFETTI PANCAKES
![]()
GET MORE RECIPE INSPIRATION HERE >> FOLLOW ME ON PINTEREST
![]()
STAINED GLASS LOLLIPOPS > YOUR THOUGHTS
Have you ever made a hard-candy recipe before? What do you think about this fun stained glass lollipops recipe? I’d love to hear your thoughts in the comments below!


when do you add the extract?
Hello Catherine. In the recipe card, refer to the second sentence in Step 4. That’s when to add in the extract/flavoring. Have fun with this recipe. The lollipops are so beautiful!
Hiii.. :):) just tried it recipe. They look great. But I wanted to know how long do they take to harden and how long should i wait before i remove them from the silicon mat and parchment paper???
It’s very hot here in india so in a general ac room it doesnt seem to be gettin hard.do i have to put them in the fridge and then remove it out ??
Hello Deepthi. Here in California these beautiful lollipops harden within 10 to 20 minutes as they lay on the silicone mats on the countertop. It’s important to use a candy thermometer so you know for sure that the mixture has reached the “hard crack stage.” If the mixture is too soft, it wasn’t cooked long enough and the lollipops will be soft and will not harden.
Hi ! Great recipe ! I tried so many and this one is the best so far !! I only have one question. Lollipops are kinda sticky do I need to cook my sugar a little longer ?
Thanks a lot ❤️
Hello! I tried this recipe and it turned out great! Except they are sticky. It’s not humid here in NC so maybe I need to cook it a little longer? Any suggestions? Thanks!!
Great recipe! I tried them out and they turned out great except they are really sticky. It’s not humid where I live in NC but wondered what you thought it might be? Do I need to cook them a little longer maybe?
Thanks!
Super excited about your recipe, a fun activity for the kids – how long do these keep please?
Hello Anne! I’m super excited to hear that you’ll be making these fun homemade lollipops! These gorgeous treats, if wrapped and kept in a cool dry environment, should last at least 6 months. Just check the expiration date on your corn syrup and that will give you the best time estimate. :-)
These are beautiful! However, I don’t see the measurements for the amount of water or corn syrup. I only see the amount of sugar…Did you mention it and I’m just overlooking them?
Hello Alora. Thank you so, so much for noticing that! Somehow the ingredients section of the recipe card stopped populating. I went in and reinstated it. I am so excited that you’ll be making these super fun and colorful stained glass lollipops! Yay!!! They’re super easy to make and you’re going to love them! :-)
oh my GOSH how BEAUTIFUL!
Trying these ASAP!!!
Thank you Shaylyn! I hope you love them as much as I do.
I can’t believe how fun and easy these are to make! Did I say adorable?? I’ll be making lot’s of these again for Easter and a baby shower that am throwing in the next few weeks.
I thought these were going to be hard to make, but your instructions were perfect! Mine turned out great.
Woooow these are so stunning! I HAVE to try making them with my nieces! Thanks so much for the idea :)
xx, Theresa
How FUN is this! I cant wait to make these with my niece and nephew!
Thank you Morgan! They will have so much fun making these.
Oh, my! Your creativity never ceases to amaze me! These are the cutest things I’ve seen in a long time! So fun for school treats, or Valentine’s Day parties!
Thank you Patricia! Your kind words mean so much.
These are SO pretty and colorful!!! I am a baker and can’t wait to try these out!!! Thanks for posting!!!
Thank you Tessa! These would look so good on top of a cake!
OMG! Those are gorgeous! I rarely make candy, but I think I have to try these!
Thank you Allison! These are super pretty and so fun to make.
Wow, these are so pretty! They are like little works of art! Thanks for all the tips, I think I could actually make these!
You absolutely could! I believe in you :)
These are SO MUCH FUN! I can’t wait to try them with my kids!
They will love these! I cannot wait to hear how they like them.